Astronomy Books for the Beginner, or A Practical Guide to Books That Work
As I've said in previous posts (or future ones if you're reading this backwards, which you probably are), a clear sky in Portland, OR is a rare thing indeed this time of year. November to March is a time when astronomers head indoors. I don't know what they do there, but if they're me, they take the time to learn and expand their knowledge of astronomy.
There are a lot of books on the market aimed at the beginning Amateur Astronomer, some better than others. Ask a room of 20 Amateur Astronomers for suggestions, and you're going to get 20 different answers. These are my suggestions only, ones I've found to be a great learning tool, or a great resource.
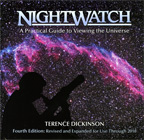
This is an almost universally recommended book for the beginning Astronomer. That's how I ended up with it. It's kind of large, it's got a spiral binding, and looks a bit like a coffee book table. All of those things would've led me to skip it in a book store. I'm glad I looked beyond that and bought it. While I prefer compact books, this one would not be the same, and the size and binding are perfect for what this is.
Think of it as an Astronomy 101 course for the Everyman. It's broken in to several sections, each with a specific purpose, each well documented with pictures and graphics, each well written and easily understandable. In easy to read chunks it teaches you about the Universe we're a tiny part of, the way objects in the night sky move, what the objects are, what the various types of telescopes are, what they're good for, how to find things in the sky, and so on. For what it is, it's not a big book at all, and by the time you're done with it with your going to know a lot of theory and practical usage.
I like this book a lot. It's not just teaching you the facts, it's teaching you the why's and whatfor's.

Think of this as a guide book to the night sky. It will show you what's out there, how to find it, what it is. This is one you're going to want to bring out viewing with you, or at least use to help plan a night of watching. It's also a really good tool for learning what things are.
I like guides like this, because they lead you through while teaching you how to do it yourself.

Yes, you can see a lot with a decent pair of Binoculars! It's not all about telescopes, and binoculars are highly recommended for a beginner to learn the sky. Most Amateur Astronomers have a trusty pair of binoculars in their kit. The easy part is, most people have a pair sitting around somewhere, and if they don't, a decent pair can be had for $30-$50. This makes it really easy for a beginner like me, and probably for you too.


You can also take an ordinary flashlight and wrap a couple of layers of red cellophane around it. I think that's a great solution if you have some red cellophane sitting around. I always seem to be out of it.
Instead, I use a time tested design that's also very cheap. I use a GI style angled flashlight. These come with colored cells to place in front of the lens, so if you need a regular white light flashlight, you've got it. If you're observing, put on the red cell. No muss no fuss. These are available in C and D battery sizes. I prefer the C just for making it more compact and lighter. You can drop these and they don't break. They're under $8 which makes them very affordable, especially if you lose it.

I hope this was helpful. If you've got your own recommendations please feel free to post them below for everyone else.
There are a lot of books on the market aimed at the beginning Amateur Astronomer, some better than others. Ask a room of 20 Amateur Astronomers for suggestions, and you're going to get 20 different answers. These are my suggestions only, ones I've found to be a great learning tool, or a great resource.
This is an almost universally recommended book for the beginning Astronomer. That's how I ended up with it. It's kind of large, it's got a spiral binding, and looks a bit like a coffee book table. All of those things would've led me to skip it in a book store. I'm glad I looked beyond that and bought it. While I prefer compact books, this one would not be the same, and the size and binding are perfect for what this is.
Think of it as an Astronomy 101 course for the Everyman. It's broken in to several sections, each with a specific purpose, each well documented with pictures and graphics, each well written and easily understandable. In easy to read chunks it teaches you about the Universe we're a tiny part of, the way objects in the night sky move, what the objects are, what the various types of telescopes are, what they're good for, how to find things in the sky, and so on. For what it is, it's not a big book at all, and by the time you're done with it with your going to know a lot of theory and practical usage.
I like this book a lot. It's not just teaching you the facts, it's teaching you the why's and whatfor's.
Think of this as a guide book to the night sky. It will show you what's out there, how to find it, what it is. This is one you're going to want to bring out viewing with you, or at least use to help plan a night of watching. It's also a really good tool for learning what things are.
I like guides like this, because they lead you through while teaching you how to do it yourself.
Yes, you can see a lot with a decent pair of Binoculars! It's not all about telescopes, and binoculars are highly recommended for a beginner to learn the sky. Most Amateur Astronomers have a trusty pair of binoculars in their kit. The easy part is, most people have a pair sitting around somewhere, and if they don't, a decent pair can be had for $30-$50. This makes it really easy for a beginner like me, and probably for you too.
You can't get there without a map, can you? A great resource for finding what's out there. This is another one you're going to want to take outside with you. Easy to learn and easy to understand (Sky & Telescope has a video tutorial on their website if you want) this really helps you figure out where to find something, as well as figuring out what you've stumbled upon.
A good star chart is a must for any Amateur Astronomer, and I find that this is a perfect balance between too much and not enough.
This is what's called a Star Finder or Planisphere. They can be intimidating at first, but are really easy to use. It rotates around, and you just pick the side that has the direction you're facing, then dial in the current date and time. Bam! It shows you what's in the current sky and what's coming up.
This is definitely one of those things you'll want to use in conjunction with the star charts above, and you'll want to take it with you. There are a lot of planispheres on the market, and each one has its own quirks. I chose this one as it's easy to see in the dark when using a red light flashlight (see below). Get one you like and find easy to use. The major thing to be concerned with when buying any planisphere, is getting one that works in your area. The one above is made for people viewing from 40°-50° longitude. I live at 45°, so this is perfect for me. If you live in Phoenix, AZ, you're at 33°, so this exact one would be worthless, you'd want the 30°-40° one, or any planisphere that encompasses 33°.
How do you know where you're at? Easy! Just look it up right here. If you travel around the country a lot, buy a couple, they're not expensive and they're useful to have.
So, you've got all these great resources, charts and maps, and you want to take them outside to consult while you observe. Fantastic. Only, it's dark out and you can't read in the dark. And you don't want to bring a flashlight with you, because you need to preserve your night vision.
What you want is a good, easy to use red light flashlight. Red light will preserve your night vision and allow you to write, read, sketch, do whatever you need to. There are a few small red LED flashlights out there specifically sold as "astronomy flashlights". Those are good, but I think they're really overpriced. Many are basically cheap novelty flashlights that instead of being cheap or free, go for around $20. No thanks!
You can also take an ordinary flashlight and wrap a couple of layers of red cellophane around it. I think that's a great solution if you have some red cellophane sitting around. I always seem to be out of it.
Instead, I use a time tested design that's also very cheap. I use a GI style angled flashlight. These come with colored cells to place in front of the lens, so if you need a regular white light flashlight, you've got it. If you're observing, put on the red cell. No muss no fuss. These are available in C and D battery sizes. I prefer the C just for making it more compact and lighter. You can drop these and they don't break. They're under $8 which makes them very affordable, especially if you lose it.
I hope this was helpful. If you've got your own recommendations please feel free to post them below for everyone else.

For a cheap bright, pure, long-lived, waterproof red light, get a bicycle rear light. They usually run for hundreds of hours on an AAA battery or two and are tiny.
ReplyDeleteGoogle has a "skymap" app on android devices.
Looked at the binocular refs, they miss out two important points.
ReplyDelete1. Young eyes (<25 years) have 7-9mm pupil size in the dark. The exit pupil of a binocular or telescope can be found by dividing the objective size by the magnification. EG, a 7x50 has a 50/7=7.14 exit pupil. 80 year old eyes have more like 4-5mm. So if young (&strong), get the heavier, bigger, pricier binocs. More than a 7mm exit pupil is wasted on humans. This also has effects on using telescopes. Divide your pupil size into the objective size and you get the ideal minimum magnification you should use. Less magnification would waste light. See http://amateurastronomy.org/EH/Apr96.PDF
2. The -apparent- angle of view is easily found by multiplying the view angle by the magnification. So 7x50 with a 8 degree angle will have an apparent 56 degree view. You can then compare binocs of different magnifications better. I like the wider apparent views better - your eye edges catch meteors better and you feel more "in" the picture.
Hi tOM, thanks for the comments.
ReplyDeleteI would disagree that my binocular refs miss any points. While your two points are correct; I did not write a binocular buyer's guide. I wrote about the binoculars that I bought and am enjoying.
Thanks for reading!